One stop supplier of water treatment parts&accessories


Big Blue Whole House Filter Replacement: Easy Steps to Swap Out Your Old Filter!
Okay, folks, gather ’round. I’ve got a story for ya – a tale of man versus plumbing. Not quite biblical, but it felt like it at the time. I’m talking about the good ol’ adventure of replacing my big blue whole house water filter.
The Prep Work
So, picture this: I noticed the water pressure was getting a bit sad, kinda like a dripping faucet instead of a strong flow. Plus, the water started tasting, well, not like water. More like, I don’t know, like it had been hanging out with some old pennies. That’s when I knew it was time. Time to change the filter in my big blue whole house filtration system, that big boy that’s supposed to keep the water clean for the whole house.
First thing I did was gather my tools. I’m no handyman, but I’ve learned a few things over the years. You’ll need:
- A filter wrench – This thing is crucial. It’s a special wrench that fits around the filter housing and helps you unscrew it.
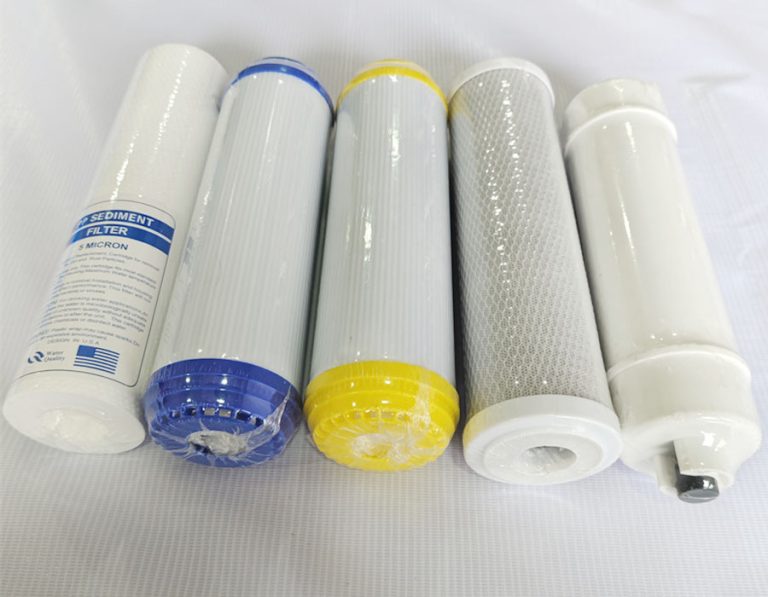
- A new filter cartridge – Make sure you get the right size! They’re not all the same. I grabbed the replacement for my big blue filter.
- A bucket – Trust me, you’ll need this to catch the water when you open up the housing.
- Some plumber’s tape – This white tape helps seal the threads and prevent leaks. It is cheap, so I bought two.
- Maybe some gloves – If you don’t want to get your hands all wet and grimy.
Turning Off the Water
Alright, next step, and this is important: turn off the water. You don’t want a surprise shower while you’re working. I went to my main water shut-off valve, which for me is in the basement, and turned that baby clockwise until it wouldn’t go any further. Done. Water’s off.
Releasing the Pressure
Now, even though the water’s off, there’s still some pressure in the system. To release it, I turned on a faucet in the house, just let it run until it slowed to a trickle. That way, I wouldn’t get sprayed when I opened the filter housing. I also pressed the red pressure-release button on top of my filter housing.
Wrenching the Housing Off
Here comes the fun part. I grabbed my filter wrench, placed it around the big blue housing, and started turning. It was a bit tough at first – these things can get pretty snug. I had to put some muscle into it, but eventually, it started to loosen. Slowly, I unscrewed the housing, keeping my bucket underneath to catch any spills.
Out with the Old, In with the New
Once the housing was off, I carefully pulled out the old filter. Man, it was nasty! All discolored and full of gunk. No wonder my water tasted funny. I dumped the old filter in the trash and rinsed out the housing with some clean water.
Then, I took my brand new filter cartridge, unwrapped it, and popped it into the housing. Easy peasy. I made sure it was seated properly, nice and snug.
Sealing it Up
Before screwing the housing back on, I wrapped some plumber’s tape around the threads. This helps create a watertight seal. I didn’t overdo it, just a couple of wraps around. Then, I carefully screwed the housing back onto the filter head, tightening it with the wrench. Not too tight, just enough to feel secure.
Turning the Water Back On
Almost there! I went back to my main water valve and turned it on slowly, counterclockwise. While I was doing that, I had another faucet open in the house to let any trapped air escape. Once the water was flowing smoothly, I closed the faucet.
Checking for Leaks
Last but not least, I checked the filter housing for any leaks. I ran my hand around it, feeling for any moisture. Dry as a bone. Success! I also checked the water pressure and taste. Much better! Back to normal, with clear, clean-tasting water.
And that’s it! My water filter replacement adventure. It wasn’t as hard as I thought it would be. Just a bit of elbow grease and some patience. Now, my water’s flowing nicely, and it tastes great. Plus, I saved myself a bunch of money by not calling a plumber. Win-win! If you’re thinking about doing it yourself, go for it! Just remember the steps, and you’ll be fine.